In the context of software development, a modern CI/CD (Continuous Integration/Continuous Deployment) pipeline is a set of practices that are used to automate the process of integrating code changes, running tests, and deploying applications to production environments. These pipelines help developers and teams deliver software more efficiently and with higher quality.
In this blog, the below topics have been covered:
What is CI/CD
What is CI/CD Pipeline
K8s and CRDs
What is Tekton
Tekton Workflow
Tekton Benefits
Major components of Tekton ecosystem
Prerequisites for configuring Tekton
Recommended platforms for running Tekton
Tekton Installation
Key features of Tekton Dashboard
Tekton Dashboard-based Task & Pipeline hands-on
What is CI/CD?
Continuous Integration and Continuous Delivery (CI/CD) represent essential practices in modern software development, streamlining the process of building, testing, and delivering code changes. Continuous Integration involves frequent integration of code into a shared repository, with automated builds and tests triggered upon each integration to catch issues early. Continuous Delivery extends CI by automating the deployment process, ensuring that code is always in a release-ready state and can be deployed to production-like environments at any time.
What is CI/CD Pipeline?
The heart of CI/CD is the CI/CD pipeline, a structured series of automated steps that guide code through various stages, including tasks, stages, triggers, dependencies, and variables. This pipeline orchestrates the software delivery process, providing consistency, efficiency, and visibility into code changes. Tasks, representing individual units of work, are grouped into stages, and dependencies dictate the order of execution. Triggers initiate the pipeline, and variables enhance flexibility. Several tools facilitate CI/CD, including Jenkins, GitLab CI/CD, Travis CI, CircleCI, GitHub Actions, TeamCity, Azure DevOps, and GoCD, each offering unique features and integrations to automate and optimize different aspects of the software delivery lifecycle. In this blog, we will discuss the K8s CRD Pipeline system, which helps to implement a pipeline job as a task by referring to the custom resources definitions.
Pipeline
K8s and CRDs:
Job Execution on K8s: Kubernetes acts like a job execution system where its scheduler handles placing pods, and these pods act as the ones executing the jobs.
CI/CD System Evolution: CI/CD systems transform from basic job execution engines to comprehensive solutions by incorporating elements such as Pipelines, UIs, and integrations with diverse tools, adapting to evolving requirements.
Tekton and K8s Integration: Tekton aligns seamlessly with the evolution of CI/CD systems by establishing itself as a Kubernetes-dependent framework that utilizes Kubernetes as its foundational infrastructure.
CRDs in Tekton: Tekton introduces Custom Resource Definitions (CRDs) as fundamental building blocks, representing jobs as Task custom resources. This architecture enables the execution of tasks through TaskRuns, the chaining of multiple tasks via Pipelines, and the execution of pipelines through PipelineRuns.
Reusability with CRDs: Tekton’s adoption of CRDs enhances reusability, enabling the creation of organization-wide sets of tasks and standardized pipelines, fostering a modular and scalable approach.
Pods running as Tasks: Tekton executes tasks as pods, offering a level of flexibility comparable to the management of Kubernetes pods. This approach provides a seamless integration of Tekton within Kubernetes environments.
Specified Custom Resources: TaskRuns and PipelineRuns are specified as Custom Resources in Tekton, streamlining the configuration process and contributing to a more organized and maintainable CI/CD workflow.
What is Tekton?
Tekton is an innovative open-source framework dedicated to orchestrating Continuous Integration and Continuous Delivery (CI/CD) systems. It sets itself apart by leveraging Kubernetes Custom Resources (CRs) to express CI/CD pipelines in a declarative manner. Tekton’s design aligns seamlessly with its overarching goal of being inherently cloud-native, remarkably flexible, and exceedingly extensible. This design philosophy enables Tekton to accommodate a diverse spectrum of CI/CD workflows.
Notably, Tekton holds the distinction of being a CNCF (Cloud Native Computing Foundation) certified tool. This certification underscores Tekton’s industry-wide recognition and its commitment to adhering to best practices. Additionally, as a Graduated Continuous Delivery Foundation project, Tekton follows the OpenSSF (Open-Source Security Foundation) best practices.
In the context of GitOps-driven CI/CD scenarios, Tekton demonstrates resilience and excels in tailored integrations and finely tuned configurability. It proves particularly well-suited for dynamic Kubernetes environments. Tekton’s modular architecture serves as a cornerstone for achieving customization, reusability, and standardization within CI/CD processes. This modularity provides unparalleled flexibility to assemble tasks within pipelines based on specific project requirements.
Tekton further stands out with its user-friendly deployment onto Kubernetes clusters. This deployment can be accomplished effortlessly with a single command, ensuring a rapid and efficient setup process. While Tekton may present a learning curve, this challenge is mitigated by an intuitive modular dashboard. This dashboard enhances management and visibility features, contributing to a smoother user experience.
Tekton’s strength lies in its capability to define CI/CD pipelines as code. Coupled with adaptability, flexibility, and streamlined deployment processes, Tekton emerges as an optimal choice for GitOps-driven CI/CD workflows, particularly in the dynamic landscape of Kubernetes environments.
Tekton workflow:
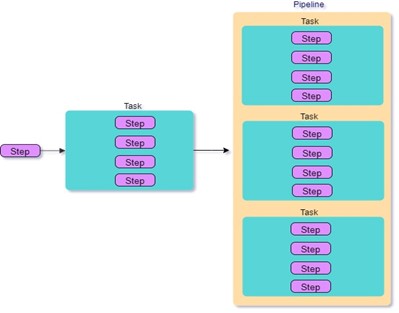
Tekton introduces the concept of Steps, Tasks & Pipeline which helps to manage the workloads in the Kubernetes cluster.
Steps: It is a fundamental element in Tekton. A Step represents a Kubernetes container image tasked with executing a specific tool or handling a designated input (e.g., writing or reading a file).
Task: Itdefines a sequence of ordered Steps. Each Step triggers a specific build tool on a designated set of inputs and generates a specific set of outputs. These outputs can be utilized as inputs in the subsequent Step.
Pipeline: It outlines a sequence of ordered Tasks. Similar to Steps in a Task, a Task within a Pipeline can leverage the output of a previously executed Task as its input.
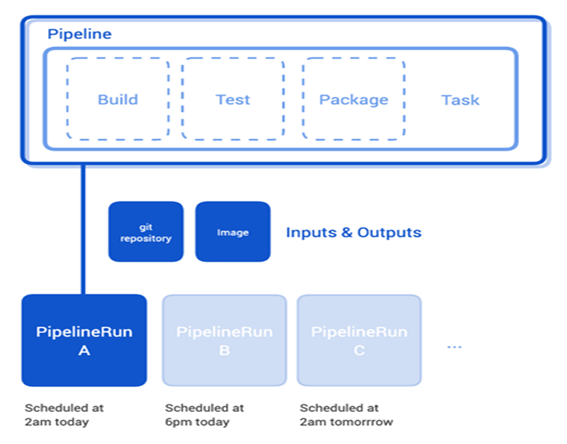
TaskRun: It initiates the execution of a specific Task on a particular set of inputs, producing designated outputs. Essentially, the Task conveys what Tekton should do, and a TaskRun specifies both what to execute it on and additional details, such as build flags.
PipelineRun: It activates a Pipeline to run on a particular set of inputs and generate specific outputs to destinations. Each Task runs in its dedicated Kubernetes Pod. As the default configuration, Tasks within a Pipeline do not share data. To facilitate data sharing among Tasks, explicit configuration is required for each Task to make its outputs available for the next Task and to consume the outputs of a previously executed Task, as applicable.
Source: tekton.dev
Tekton Pipelines automates the scheduling of containers before and after your step containers to facilitate built-in features. These include tasks like retrieving input resources and uploading outputs to blob storage solutions. You can monitor the status of these processes through TaskRuns and PipelineRuns. Additionally, the system conducts various operations to prepare the environment before executing the step containers.
Tekton Benefits:
Customizable
Expandable
Reusable
Standardized
Scalable
Major Components of Tekton Ecosystem:
Tekton Pipelines: It is the core of Tekton, and establishes Kubernetes CRD as foundational building blocks for CI/CD.
Tekton Dashboard: It is a Web-based GUI interface for Tekton Pipelines.
Tekton Triggers: Allows to initiate pipelines based on events.
Tekton CLI: Tekton offers a CLI interface called tkn, built on the K8s CLI for interacting with the Tekton.
Tekton Catalog: Community-contributed repository for Tasks, Pipeline and so on.
Tekton Hub: Web-based GUI interface to access the Tekton Catalog.
Tekton Operator: Kubernetes Operator pattern for installing, updating, and removing Tekton projects on the K8s cluster.
Tekton Chain: Generates, stores, and signs artifact provenance for Tekton Pipelines.
Prerequisites for configuring Tekton:
A Kubernetes cluster running version 1.26 or later
Kubectl
Assign cluster-admin privileges to the current user
Metrics Server (Optional)
Recommended Platforms for running Tekton:
All the Kubernetes Platforms such as Native Kubernetes, Enterprise Kubernetes, Managed Kubernetes & Lightweight Kubernetes can be used for running Tekton.
In this blog, we will use Minikube as a local Kubernetes cluster for Tekton configuration and Tekton Pipeline.
Tekton Installation:
For Tekton Installation we are using the Minikube over the Ubuntu 22.04 OS with Docker Container, where the OS is getting installed on a local system having 4 core CPUs, 8 GB of RAM, and 120 GB of disk space.
Recommended resources for Tekton Installation are:
OS Platform: Ubuntu 22.04 LTS
user1@thinknyx:~$ hostnamectl | grep -i system
Operating System: Ubuntu 22.04 LTS
Docker Installation:
Below commands are executed to configure the docker over the Ubuntu OS.
user1@thinknyx:~$ curl -LO https://storage.googleapis.com/minikube/releases/latest/minikube-linux-amd64 % Total % Received % Xferd Average Speed Time Time Time Current Dload Upload Total Spent Left Speed 100 89.3M 100 89.3M 0 0 13.0M 0 0:00:06 0:00:06 –:–:– 18.3M user1@thinknyx:~$ user1@thinknyx:~$ sudo install minikube-linux-amd64 /usr/local/bin/minikube user1@thinknyx:~$ curl -LO https://storage.googleapis.com/kubernetes-release/release/`curl -s https://storage.googleapis.com/kubernetes-release/release/stable.txt`/bin/linux/amd64/kubectl % Total % Received % Xferd Average Speed Time Time Time Current Dload Upload Total Spent Left Speed 100 47.4M 100 47.4M 0 0 10.6M 0 0:00:04 0:00:04 –:–:– 10.6M user1@thinknyx:~$ chmod -c +x kubectl mode of ‘kubectl’ changed from 0664 (rw-rw-r–) to 0775 (rwxrwxr-x) user1@thinknyx:~$ sudo mv -v kubectl /usr/local/bin/ copied ‘kubectl’ -> ‘/usr/local/bin/kubectl’ removed ‘kubectl’ user1@thinknyx:~$ kubectl version -o yaml clientVersion: buildDate: “2023-12-13T08:51:44Z” compiler: gc gitCommit: 3f7a50f38688eb332e2a1b013678c6435d539ae6 gitTreeState: clean gitVersion: v1.29.0 goVersion: go1.21.5 major: “1” minor: “29” platform: linux/amd64 kustomizeVersion: v5.0.4-0.20230601165947-6ce0bf390ce3
The connection to the server localhost:8080 was refused – did you specify the right host or port?
After a successful deployment of Minikube, let’s start it using the below command.
$ minikube start –driver=docker
user1@thinknyx:~$ minikube start –driver=docker * minikube v1.32.0 on Ubuntu 22.04 (vbox/amd64) * Using the docker driver based on user configuration * Using Docker driver with root privileges * Starting control plane node minikube in cluster minikube * Pulling base image … * Downloading Kubernetes v1.28.3 preload … > preloaded-images-k8s-v18-v1…: 403.35 MiB / 403.35 MiB 100.00% 12.65 M > gcr.io/k8s-minikube/kicbase…: 453.90 MiB / 453.90 MiB 100.00% 8.75 Mi * Creating docker container (CPUs=2, Memory=2200MB) … * Preparing Kubernetes v1.28.3 on Docker 24.0.7 … – Generating certificates and keys … – Booting up control plane … – Configuring RBAC rules … * Configuring bridge CNI (Container Networking Interface) … – Using image gcr.io/k8s-minikube/storage-provisioner:v5 * Verifying Kubernetes components… * Enabled addons: storage-provisioner, default-storageclass * Done! kubectl is now configured to use “minikube” cluster and “default” namespace by default
Verify Minikube Status:
$ minikube status
user1@thinknyx:~$ minikube status minikube type: Control Plane host: Running kubelet: Running apiserver: Running kubeconfig: Configured user1@thinknyx:~$ kubectl get nodes NAME STATUS ROLES AGE VERSION minikube Ready control-plane 89s v1.28.3
Tekton pipeline installation over the Minikube:
All the executions are referred from the official Tekton installation page, which provides step-by-step guidance for installing Tekton in various scenarios such as
Local Kubernetes Cluster: Set up a K8s cluster on the local machine to facilitate testing and development with Tekton.
Install Tekton Pipelines: Specified commands to install Tekton Pipelines on the Kubernetes cluster, laying the foundation for orchestrating CI/CD workflows.
Install and Set Up Tekton Triggers: Enhance Tekton’s capabilities by installing and configuring Tekton Triggers on the Kubernetes cluster, enabling automated workflow triggering based on events.
Additional Configuration Options: Explore and implement additional configuration options during the Tekton Pipelines installation, providing flexibility for tailoring Tekton to specific workflow requirements.
Here we will use the below commands, which are sourced from the official documentation, a comprehensive guide for Tekton installation, encompassing local cluster setup.
user1@thinknyx:~$ kubectl apply –filename https://storage.googleapis.com/tekton-releases/pipeline/latest/release.yaml namespace/tekton-pipelines created clusterrole.rbac.authorization.k8s.io/tekton-pipelines-controller-cluster-access created clusterrole.rbac.authorization.k8s.io/tekton-pipelines-controller-tenant-access created clusterrole.rbac.authorization.k8s.io/tekton-pipelines-webhook-cluster-access created . . . deployment.apps/tekton-pipelines-webhook created service/tekton-pipelines-webhook created
Check the Tekton Pipeline deployment status:
$ kubectl get pods –namespace tekton-pipelines
user1@thinknyx:~$ kubectl get pods –namespace tekton-pipelines NAME READY STATUS RESTARTS AGE tekton-events-controller-5f96bb4dfc-gkn68 1/1 Running 0 14m tekton-pipelines-controller-769dd55949-tnmwm 1/1 Running 0 14m tekton-pipelines-webhook-7d47885cbf-m4dvd 1/1 Running 0 14m
We will enable the Tekton Dashboard with read/write privilege:
user1@thinknyx:~$ kubectl port-forward -n tekton-pipelines service/tekton-dashboard 9097:9097 & user1@thinknyx:~$ Handling connection for 9097 user1@thinknyx:~$ Handling connection for 9097
To grant RBAC on “default” service account, copy & paste the below manifest on your terminal. Press “Enter” on your keyboard then press “Ctrl + d” for assigning cluster role privilege to the “default” service account.
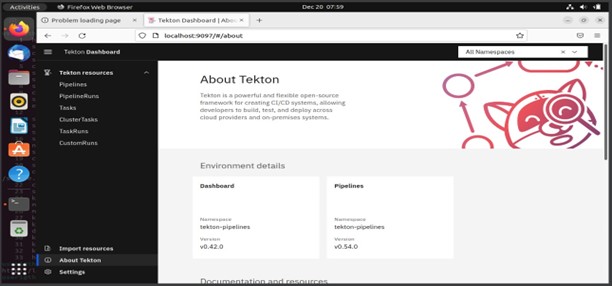
Once all the above steps are executed successfully, open your browser and access Tekton using http://localhost:9097
The Tekton Dashboard serves as a versatile, web-based user interface for handling Tekton Pipelines and Tekton Triggers resources. Users can effortlessly oversee and monitor the entire lifecycle of Tekton resources, from creation to execution and completion, through the intuitive interface that it provides.
Key features of the Tekton Dashboard include:
Real-time display of PipelineRun and TaskRun status along with detailed logs.
Resource filtering based on labels for efficient organization.
Comprehensive overview and YAML representation of resources for enhanced visibility.
Option to focus on resources either across the entire cluster or within a specific namespace.
Seamless importing of resources directly from a git repository, streamlining workflows.
Extensibility through the incorporation of additional functionalities via extensions.
Tekton Dashboard-based Task & Pipeline hands-on:
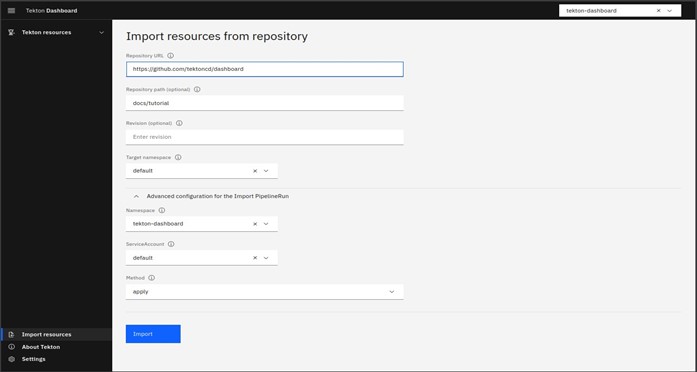
To showcase the capabilities of the Dashboard, we will import two straightforward Tasks and a Pipeline definition from GitHub. This demonstration will highlight the Dashboard’s ease of use and efficiency in handling Tekton resources. The importation process will not only illustrate the simplicity of bringing in tasks and pipelines but also emphasize the platform’s ability to manage and display these resources seamlessly. Through this example, you will get a practical understanding of how the Tekton Dashboard simplifies the management and visualization of Tekton Pipelines and Tasks.
Expand the Advance configuration for the Import PipelineRun
Namespace: tekton-dashboard
ServiceAccount: default
Method: apply
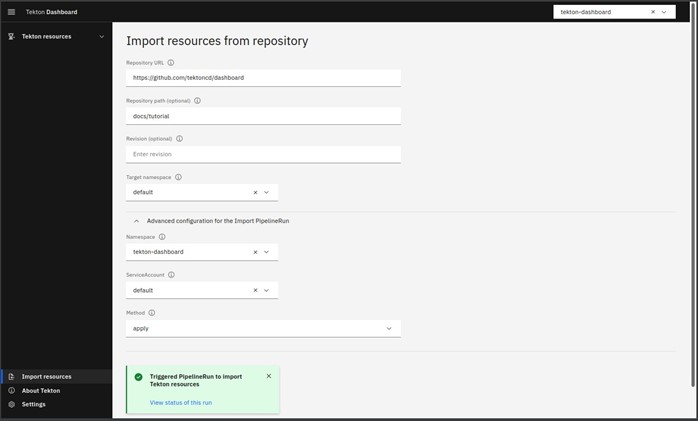
Press Import
After successful import, you will get the prompt of “view status of this run”.
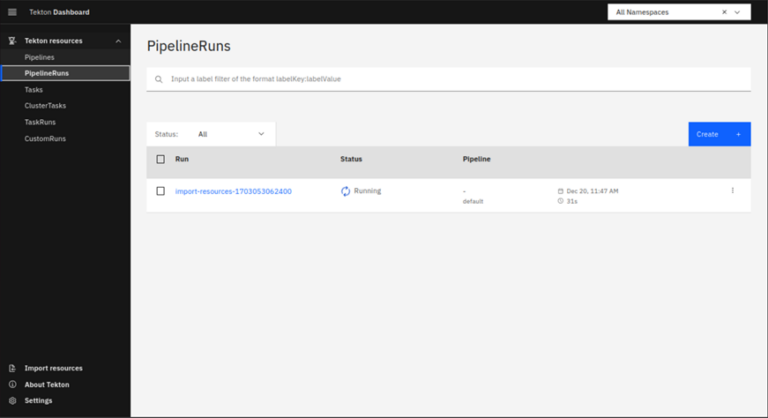
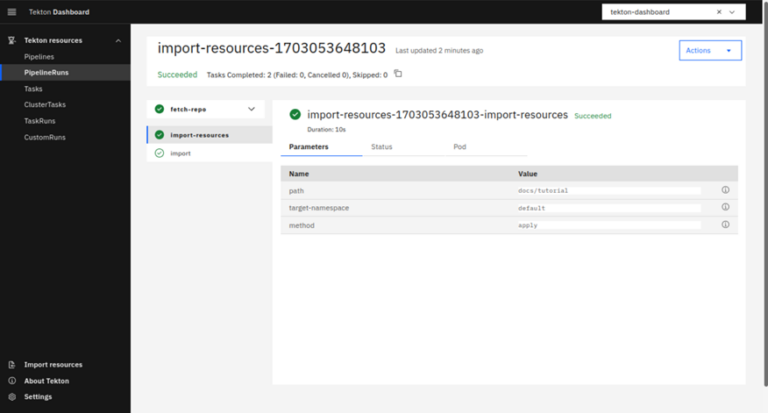
Expand the “Tekton resources” on the top left side and click “PipelineRuns”
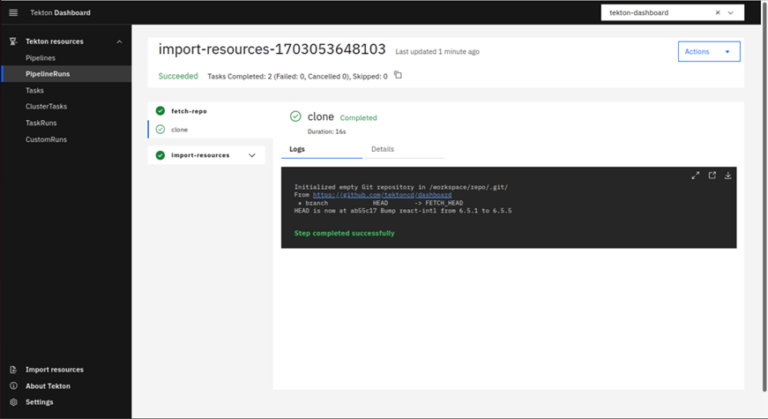
Wait a while and click the link below “Run” to check the status of importing the resources under “fetch-repo”.
To get more details about importing resources click “Import-resources”
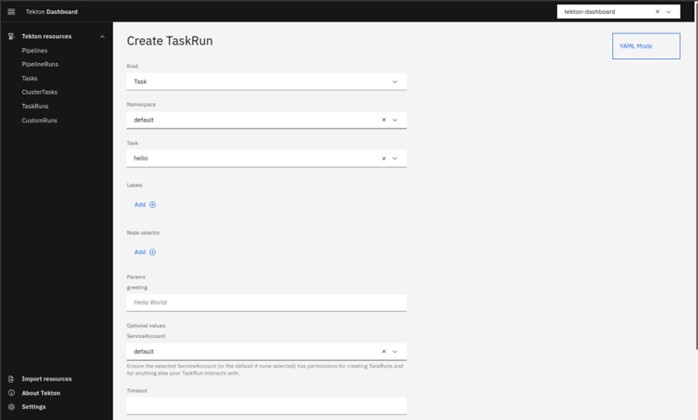
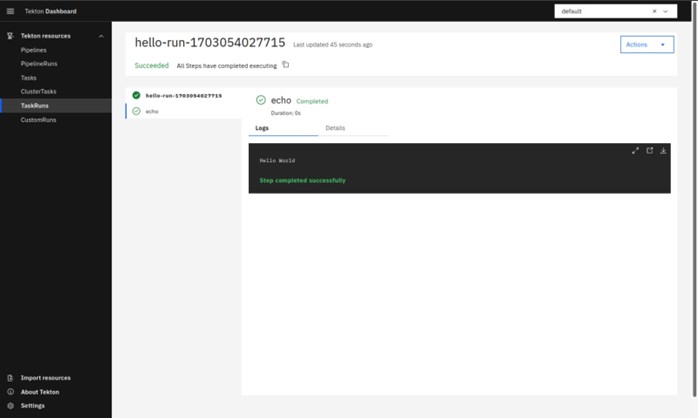
After the successful resource import, we will create a TaskRun which will be completed with “Hello World”
Kind: Task
Namespace: default
Task: hello
Service Account: default
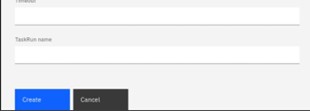
Now create a task by pressing the Create.
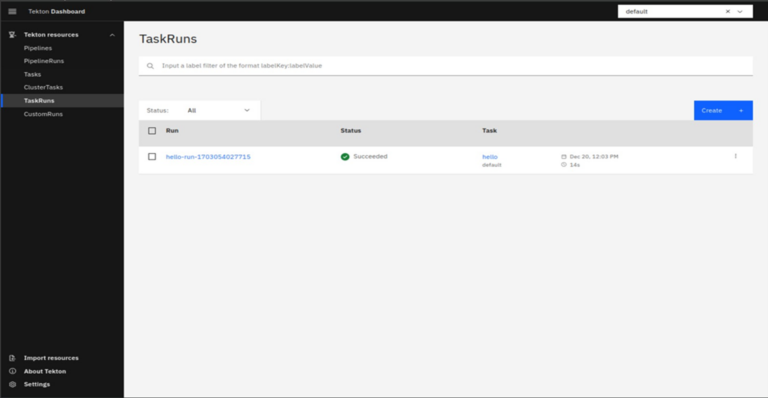
Switch to the TaskRuns on the left side top menu and select. It will show the running task hello.
Select the task link and under the logs, you will get the output “Hello World”.
This is an example of a Task that will be running sequentially as per the CRD.
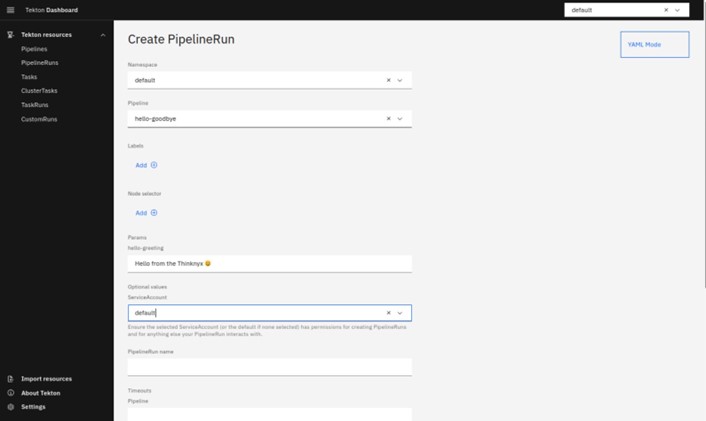
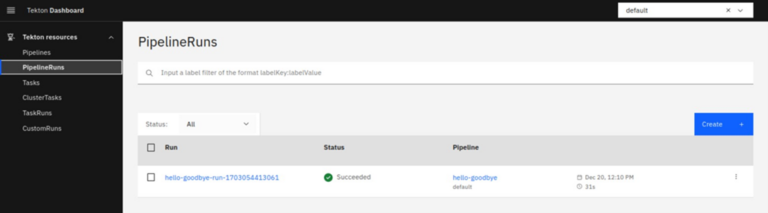
Now, we will create a PipelineRun using all of the resources we have imported before.
Switch to the PipelineRuns on the left side top menu and select it, here it will be blank and you need to create a new PipelineRun based on the Imported resource.
Create a pipeline following the below details:
Namespace: default
Pipeline: hello-goodbye
Params > hello-greeting: Hello from the Thinknyx 😀
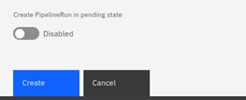
Now create a PipelineRun by pressing the “Create”.
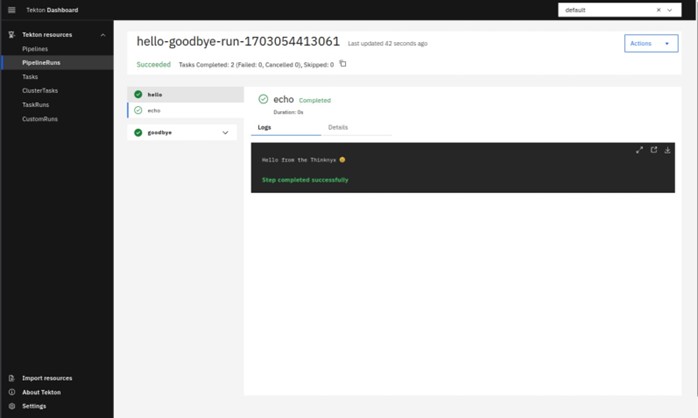
Go to the logs message and you will get “Hello from the Thinknyx 😀”.
After the creation of the PipelineRun, you will be directed to the PipelineRuns page. To access the logs, simply click on the PipelineRun name in the table. On the PipelineRun details page, you will encounter two TaskRuns, namely ‘hello’ and ‘goodbye,’ aligning with the Tasks specified in our Pipeline. Each TaskRun includes a ‘step echo,’ presenting a message in the logs. This step-by-step breakdown allows for a clear visualization of the execution process, enabling users to easily monitor and analyse the outcomes of each defined Task within the Pipeline.
Conclusion:
In summary, this tutorial offered a thorough exploration of CI/CD, emphasizing its significance in modern software development. It detailed the integration of Kubernetes and CRDs and focused on Tekton, an open-source framework streamlining CI/CD pipelines. The tutorial covered Tekton’s workflow, benefits, ecosystem components, installation on Minikube, and the Tekton Dashboard’s key features. A hands-on demonstration illustrated importing tasks and pipelines.
The conclusion featured a practical example of Tekton in action, creating a TaskRun and PipelineRun for sequential task execution. Overall, this tutorial serves as a comprehensive guide for readers to implement and leverage Tekton in Kubernetes environments for efficient CI/CD workflows.